Most website owners trust default content management system installation settings and this is a huge mistake. You must secure WordPress website before it is being hacked, because after it may be more complicated or even not possible to do it yourself.
Table of Contents:
Secure WordPress website (checklist):
Below you will find all the steps to protect blogs or website from attacks. This will minimize the risk of accidents and will monitor the system.
1. Pick a good hosting company
Every hosting provider will install your website on a specific assigned package, which includes a specific server configuration. Yes, not everyone will understand those “geeky” terms, but at least don’t pick the cheapest option and make sure the support is active for you to get help all the time.
I personally suggest you host a blog or website on VPS (virtual private server) and take over control into your own hands.
2. Use SSL certificate
Most domain registrars and hosting providers offer SSL (secure socket layer). And I can’t see any reason why not to take this opportunity- it is free these days using services like Let’s Encrypt.
Force secure connection via .htaccess file. Anyone who makes a request to a non-secure version of the website should be redirected to HTTPS all the time. Simply add the code below if it is not there yet.
RewriteEngine On
RewriteCond %{SERVER_PORT} 80
RewriteRule ^(.*)$ https://www.your-domain-name.com/$1 [R,L]
This will redirect all traffic from port 80 (default port to access the web) to a secure connection.
3. Route all traffic via Cloudflare CDN
Cloudflare will proxy all your website traffic and will protect you from DDOS (distributed denial of service attacks). On top of that, you will utilize content delivery network features, caching, rate limiting, and much more. It is super simple as you only need to change nameservers on your domain registrar to start using the service.
4. Only use strong passwords
Never ever use the same password twice for other accounts because if one leaked,- same credentials may be used to login to your other accounts or websites. I know it is impossible to remember those long letter, number, and symbol combinations so for this reason, use a password manager of your choice.
Random strong password generator tool on my website
You can use a browser extension here
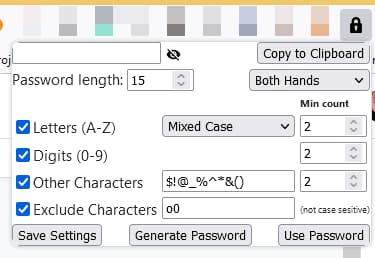
What’s happening “behind the scenes” is attackers will use commonly used words from leaked password databases and will try to log in to your system over and over. One of the biggest is RockYou consisting of 8 billion phrases compiled from many. You can restrict how many times someone can try to login in a specific period of time and block unauthorized attempts via WordFence or another security plugin.
5. Don’t use “cracked” WordPress themes
Never add “cracked” themes to your WordPress blog, rather use free if you can’t afford to get premium. All those “nulled” themes may have additional malicious codes, which will open backdoors to hackers and they will exploit your website (be sure about that!). If you go for a premium WordPress theme, then I recommend you try GeneratePress: it is a lightweight, fast, mobile responsive theme.
6. Delete inactive plugins
Remove all inactive plugins- you can download them anytime. So many of them on WordPress repositories are marked as not tested and not updated for a long period of time with the latest version- this is a sign, it may be not safe to use such plugins anymore. This will also remove a lot of bloats and the website will load faster because every plugin is hooked with additional PHP lines of code.
7. Install security plugin
I personally suggest using the WordFence plugin, which will work as WAF (website application firewall). It is simple to set up and even the free version will do a job like scanning for malicious code, live traffic monitoring, 2FA (two-factor authentication) on the login page. Rules you can set up according to your needs.
8. Secure WordPress login custom URL
Most WordPress scanners will check default login pages:
yourdomain/wp-login
yourdomain/wp-admin
There is a way to move this URL and it can look like this:
yourdomain/your-secure-URL
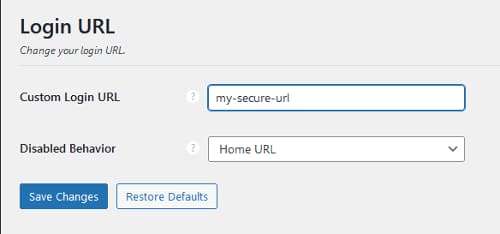
In this case, everyone making a request to the default login page can be redirected to the home page and only you will know the exact login link.
P.S. At this point you can also set the rule in WordFence to block anyone who tries to access the default login page via WordFence (if you’d like).

There are many plugins, which can do a job, but I suggest perfmatters plugin, because it has more great optimization features like disabling XML-RPC, RSS, self pingbacks, removing the WordPress version, and many others.
9. Protect WordPress username
This is a very simple solution: you can log in to WordPress as an administrator, but all blog posts and pages publish as editor. When someone sees the author name on your website it may be used to try to log in with the same username. Having this is credential a half job done for any intruder.
Many hosting providers will install WordPress with an “admin” username by default. If this happens, make sure you change that! Login to the dashboard and navigate to the “users”, then create a new user with an assigned role according to your needs.
10. WordPress directory permissions
There are plugins that will require writable permissions for wp-content, but it is advised to change them at least for WordPress main installation files to prevent disaster from happening.
Below is the common configuration:
Log in to your host via FTP, then go to your WordPress directory.
- Set all folders to 775. It means “owner” and “group” granted persmissions to read, write and execute.
- Set all files to 664. Means “owner” and “group” has granted permissions to read and write, while others have read only.
- Find wp-config.php and set permissions from 660/664 to 444 (read-only).
- Find a .htaccess file in the root directory of your WordPress installation and change permissions to 444 (Just after everything is configured and working properly).
P.S. Avoid using 777 permissions at all costs! (read-write-execute for all users and groups on the server)
P.S.S. In this case, you will not lock your blog. Don’t worry, you can always change permissions if you’re making any configurations as an administrator of the website and revert it back. These settings are the best practices to use.
11. Make regular backups
Make sure you do regular backups manually or schedule them to be done automatically. In case something goes wrong you will be able to launch your website in one hour on the same or another hosting without any loss of traffic or search engine rankings drop.
12. Set rules in Robots.txt
You can give some rules in Robots.txt to instruct search engine robots, spiders, crawlers’ behavior. This will also add an additional layer of security. First, open your favorite browser and enter: yourdomainname/robots.txt to see content, then you can consider login to your server via FTP find that file and add this (just copy/paste):
User-Agent: *
Disallow: /cgi-bin
Disallow: /wp-
Disallow: /?s=
Disallow: *&s=
Disallow: /search
Disallow: /author/
Disallow: *?attachment_id=
Disallow: */feed
Disallow: */rss
Disallow: */embed
Allow: /wp-content/uploads/
Allow: /wp-content/themes/
Allow: /*/*.js
Allow: /*/*.css
Allow: /wp-*.png
Allow: /wp-*.jpg
Allow: /wp-*.jpeg
Allow: /wp-*.gif
Allow: /wp-*.svg
Allow: /wp-*.pdf

Sitemap: https://www.(yourdomain).com/sitemap_index.xml
If you have finished reading till the end and made changes- congrats you have a secure WordPress website. Or at least minimize the risk of being attacked as much as you can.