In case your hosting provider blocked ports to send an email or you don’t have any hosting to create your own email server this step-by-step guide will show you How to set up a professional email address using Cloudflare and Gmail.
Yes, I’ve made a little research and was surprised how much companies charge to have an email associated with the domain name. Let’s say GoDaddy is £2.49 a month for one email address, Dreamhost is $1.67 a month per one email plus many others.
The thing is you can do it yourself for much less or even free if you have a domain name already. It took me about 20 minutes to find out and configure it while sipping my coffee.
Table of Contents:
What you need for a start:
- Domain name- I use NameCheap for this, but any other registrar will work as well.
- Cloudflare account- Free to use for anyone who likes.
- Google account to access Gmail- you probably have this already.
- Brevo account (rebranded from SendInBlue) in case you want to send an email back to the recipient.
How to set up a professional email address using Cloudflare and Gmail to get emails.
Cloudflare in general does not work as the usual email server we used to know. It will be working as an intermediate to get emails and forward them to another destination. This means you can’t open your inbox and check messages via the Cloudflare dashboard.
Steps to configure Cloudflare email routing to Gmail:
- Go to your Namecheap account and get a domain name if you haven’t got one already
2. Open the Cloudflare dashboard and add the domain. Pick a free plan. You will then be prompted to set up a wizard and get instructions to change name servers.

3. Go back to the Namecheap dashboard and add Cloudflare nameservers.

Keep in mind that it may take even 24 hours to propagate new data if you have just purchased a new domain name. Usually happens faster.

4. If you plan to use this system only for email then in the Cloudflare dashboard open DNS settings and delete all DNS records. Might be your domain name was routed via Cloudflare a long time ago then skip this step because there will be records pointing to your website (if you have one).
5. On the Cloudflare, dashboard open the “email” tab routing options will pop up.

6. Create an email associated with your domain name and add the Gmail address you want to send the email to.

7. The verification email will be sent to your Gmail. Open it and confirm by clicking the button “Verify email address”.
8. Now on the Cloudflare dashboard open the “Email” tab again and you will see DNS records that you will have to add.

At this point, you can receive emails sent to your professional email address and will get them in your Gmail. If that’s your goal you can stop or read forwards and learn how to configure the system to send emails back properly associated with your domain name in the email headers.
How to configure a professional email address to send emails
Once you followed the above steps the emails you send back will be associated with your Gmail address and this is a little problem, which needs to be sorted because you want to be recognized/ linked with your professional email name.
In order for email headers to be associated with your domain name when you send them back to the recipient, you will have to use another service, which must have the SMPT option. In this example, I will show you how to do it using SendInBlue.
SendInBlue lets you send 300 emails every day so it is more than enough for personal or even small business use.
Steps to configure Cloudflare email routing to send an email:
- Register on Brevo here (previously SendInBlue).
2. On your dashboard, click on your profile => Senders & IP.

3. Add your domain and you will be prompted to add more email DNS records. Make sure to tick I want to “use this domain name to digitally sign my emails”.

4. Open the Cloudflare dashboard and add records.

When you come to the SPF record you will have to combine the record with the existing one.
v=spf1 include:_spf.mx.cloudflare.net include:spf.sendinblue.com mx ~all
5. Now on the SendInBlue dashboard open SMPT & API => SMPT=> Click the button to create a new key (this will generate a new password, as a result, keep it safe).

6. Go to your Google account and make sure you have enabled 2-step verification.

7. Go to your Gmail account and click on the gear icon, then “see all settings”.

8. Click on “accounts and import” => send mail as and click on “Add another email address”.

9. Enter the email associated with your domain and untick the box “Treat as an alias” click next.

10. Now enter SMTP credentials from SendInBlue and click add when done.

11. You will get an email to verify this action. Open Gmail inbox to get the code and paste it into the required field. Or another way is to simply click the link in the email and you will see the success message.

At this point, everything is set up and you can send test emails. However, you can make a couple of tweaks if you like.
Several improvements for professional email
Go back in your Gmail all settings and you can make the email you just added a default.
Also, you can add an option to “Reply from the same address the message was sent to”.

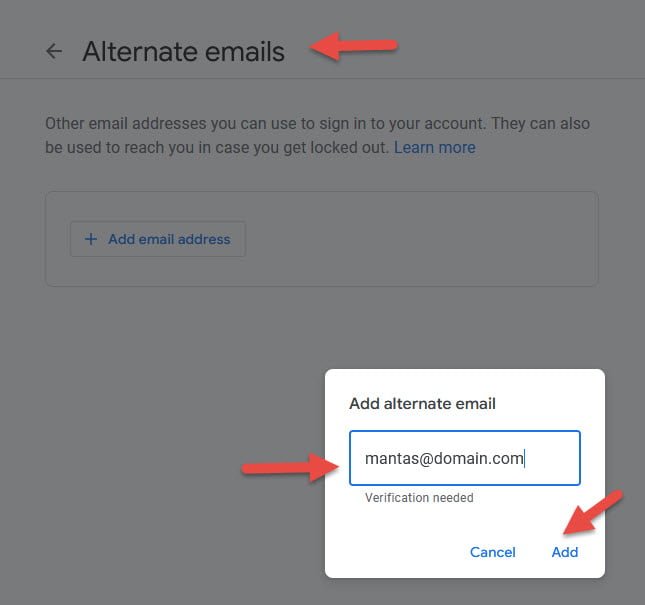
Open https://myaccount.google.com/ in the search bar and search for “email”. Click on “email personal info”
Add “alternate email” and you will be prompted to verify this action. If all is done right your professional email avatar will be the same as Gmail.
When to use this setup (my personal recommendation)
Keep in mind: this system is better for personal/small businesses and not sending large email marketing campaigns especially if you use a personal Gmail address associated. You want to separate business and personal life…
You might also like to check: How to set up a professional email address with Zoho.
Wrapping up
I hope this short guide helps you to get a professional email with CloudFlare and Gmail setup. If you have any questions reach out on Twitter @peakminute.