If you need a custom email address associated with your business or personal domain name but for some reason can’t set up an email server or hosting provider that does not give you the ability to do that, then follow this professional email address with Zoho guide.
Table of Contents:
What you will need
- Get your domain name if you don’t have one. I use NameCheap as my domain registrar, but any other will work fine.
- Sign up at Zoho to get your free account (you will need a phone number or personal email).
- Add DNS records via your domain registrar dashboard or hosting provider dashboard (where your domain is parked).
- Optionally: you can add up to 5 users (every user will have their own email address associated with your custom domain name). Every user will have 5Gb of space,- which is more than enough for email.
Professional Email Address with Zoho step by step
Get your domain name. Skip this step if you have already.

Signup with Zoho Zoho offers a variety of business services and you might get lost while reaching the right registration page, follow this link to Zoho email hosting. Use an active phone number or personal email address because you will need to verify with a code they send to you.

After confirmation, you will be redirected to another page. Don’t panic as first you will see paid plans. Scroll down and there will be an option to pick a free plan.

Add your domain name, fill in your industry and click proceed.
Verify you are a domain owner by adding Zoho provided txt record. Go to your registrar or hosting dashboard and find the tab to manage DNS (note: delete old all email DNS records like SPF, DKIM, and DMARC). I like to use Cloudflare so all examples here will be on this dashboard.
Once you add the DNS record goes back to the Zoho panel and click verify. If successful you will be prompted to create a user professional email address.

You can add more users and user groups.

Add more important email DNS records: MX, SPF, and DKIM (DNS mapping).

All records on my Cloudflare dashboard look like this.
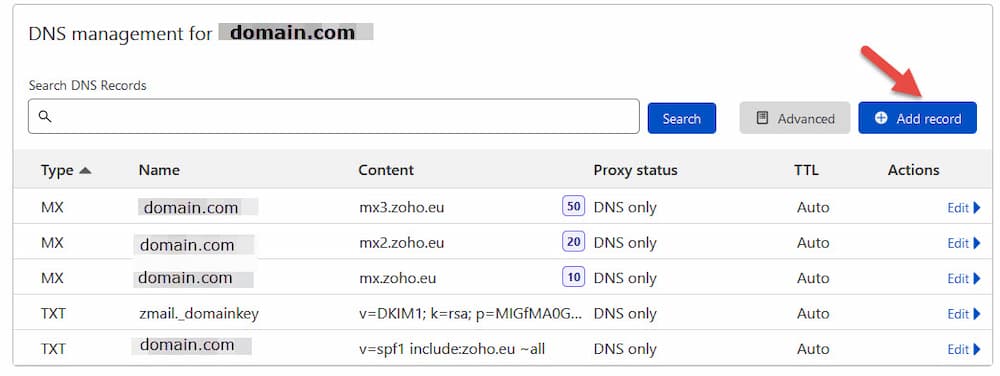
Make sure all records are verified successfully.

There is a handy option in Zoho to migrate all contacts and data to new servers, however, I have a fresh domain name.
Now it’s time to add apps on your mobile devices if you want to access, write and get emails on the go.

The last optional step is to send a real email and see it working.

Now you can finalize setting up an account: set your profile image, set the timezone, and add some security/privacy options.

BTW you can check email deliverability using this tool.
Pros & Cons
What I like about this configuration- it is useful when a hosting provider like Godaddy, Vultr, DigitalOcean, or others does not give you a free email address with your hosting and in some cases, you might even need to pay for that.
You don’t need to set up or configure the SMPT mail server and Zoho will give you all required DNS records.
No one ever will try to attack your email server, which means all secure email transfer jobs will be assigned to the Zoho email service.
However, this is not a good setup for email marketing if you want to send newsletters or email automation campaigns. I’d rather say it is good for small teams working together using the free plan.
The email function is working fine as the mail tester shows a 10/10 score in my case.
Sending/ receiving emails via computer and mobile is a piece of cake. UX (user experience) is good.
One thing I don’t like is: using free plan, that you are forced to use their email checking options. e.g. You can’t use other desktop client like Spark or Thunderbird because POP, IMAP and SMPT features are available only in paid plans.
You might also like to check How to set up proffesional email address with Cloudflare and Gmail.
Wrapping up
I hope this short guide helps you to set up professional email address with Zoho service. It’s not hard, but many people even don’t know this is possible.